
Anyone who seriously wants to get into landscape photography will come to gray filters (ND filters) at some point, for example, if a waterfall is the subject.. The reason: With the extended exposure time, the oneND filter enables movements in the picture to blur in an almost surreal way. Long exposure times are also possible on broad daylight. We conducted an interview with professional photographer Armin Leins from Marker92 Photography, who asked us 12 important questions about Photograph with gray filter answered.
1. What makes a gray filter?
2. Why do I use a gray filter?
3. What accessories do I need to photograph waterfalls with a gray filter?
4. How to photograph a waterfall with a gray filter?
5. What other motifs are suitable for photos with a gray filter?
6. When do I use which filter, especially with gradient filters?
7. How to clean filters?
8. What is good filter holder?
9. How do I calculate exposure times?
10. How do I focus when the filter is already in the holder?
11. Where do I set the focus point?
12. What mistakes can you make and how can you avoid them?

1. What does a gray filter do?
It simply reduces the amount of light hitting the camera sensor. Depending on the strength, it looks similar to sunglasses or welding goggles. That is desired to longer exposure times to be able to reach.
2. Why do I use a gray filter?
There are several use cases:
- For example, to show the flowing water of a stream velvety.
- Especially with a waterfall (which can be depicted more interestingly) or a lake (which can be smoothed out with an exposure time of several seconds).
- In city photography, for example, if I want to photograph a tourist place and with the help of a ND filter (neutral density filter) can make people disappear.n.
- Or also to let clouds move in the picture (wiping effect). In general, when I either need longer exposure times during the day or want to have a certain image effect.
- Or, for example, when I'm traveling in very sunny areas like Florida and want to do a model shoot.
Then I also take a light ND with me, so that I can still achieve a reasonable exposure time with a deliberately large aperture (e.g. aperture f1.2 or f1.4).

3. Which accessories do I need to photograph waterfalls with a neutral density filter?
For example, I also use an iPad on which my camera display is shown. When I do something like that, I often have a lot of ambient light during the day and of course I don't see very much on the camera's rather small display. Then it's hard to take the effect of onePole- orgradient filter to judge correctly.
If I do that polarizing filter If you set it wrong, the blue sky could become very patchy, which you can often only really see on the computer at home. This means that many photographers have trouble setting the polarizing filter correctly on site.
In the meantime, you can see more and more often that my workshop participants also have tablets with them and can view the result directly on the spot and, above all, control the effect of the filters used very precisely.
EspeciallyGraduated Filter should be able to position very precisely. All you need is a WiFi-capable camera and an app, which can then display the live view image from the camera on a tablet or smartphone.
Firstly, you can see the scene and the effect of the filters better because the picture is larger and secondly, you can easily position the tablet in difficult lighting conditions so that you can still see and evaluate the preview image of the motif.

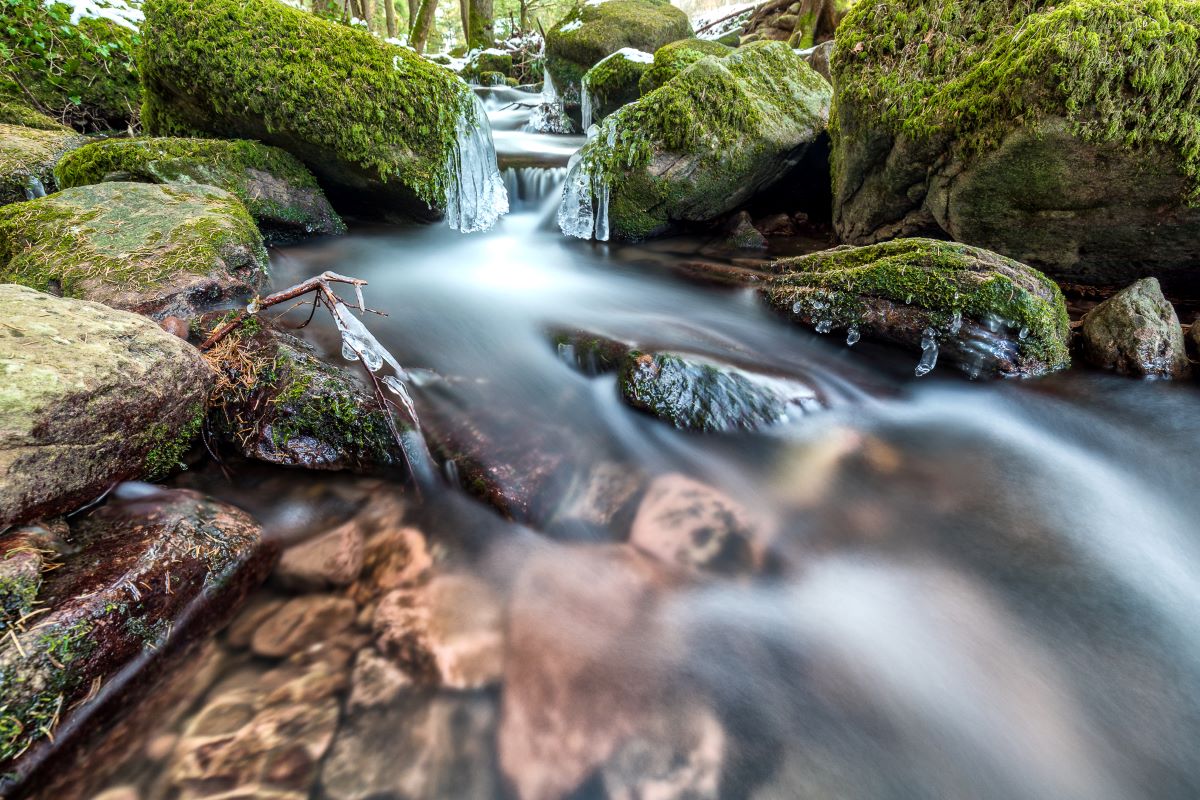
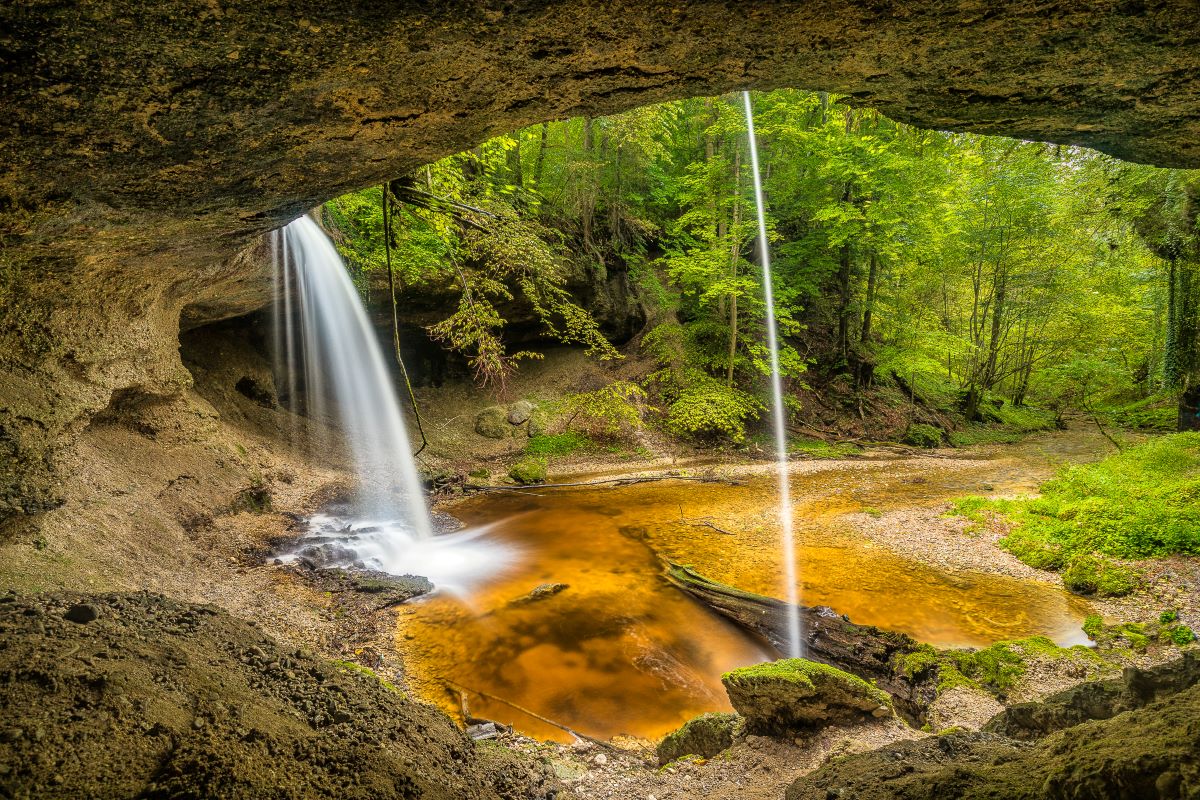
4. How to photograph a waterfall with a gray filter?
To ensure that a waterfall is not too soft and smooth, the exposure time should be between 1 and 5 seconds, depending on the water flow speed.
You choose thatND filter so that these times are achievable. The exposure time is calculated manually, using tables or an app. For example, the free Rolleimoments app, which is available in the iOS App Store and Google PlayStore.
But it is even easier to set the correct exposure time using the histogram. If all light and dark parts of the image are covered within the histogram and there are no outliers to the right (too bright) or left (too dark), I have a correctly exposed image with optimal use of the dynamic range that the camera sensor offers me, so that I can also still have reserves for post-processing without significantly losing quality.
However, this method only works for most cameras up to a maximum exposure time of 30 seconds. If the time goes beyond that, you can only see the concrete histogram afterwards after the trigger has taken place. However, that would be too long for a waterfall anyway (1-5 seconds exposure time).
So, with a neutral density filter, I photograph a waterfall as follows:
- camera for the desired image section align on the tripod
- insert filters and correct position
- Adjust exposure time
- Check histogram
- trigger camera
Either by remote trigger with a cable or wirelessly, I usually trigger via iPad or mobile phone.
Pre-release with a delay of 2 or 10 seconds is of course also possible.
This is followed by post-processing on the PC.
Above all, it is important that the camera is absolutely still and therefore a very good tripod should be used. Inadequate image results are very often due to the use of an unsuitable tripod.
5. Which other motifs are suitable for photos with a gray filter?
The following are particularly suitable:
- Urban shots of places where passing people should not be visible,
- waterfalls and
- generally motifs with clouds and water.
You often want water to be a little smooth and let clouds drift across the sky. Through the additional use of Graduated Gray Filters one tries to compensate for a too high dynamic range in the picture.
For example, if you have a very bright sky and at the same time very dark parts of the picture, such as mountains, in the picture. Without a gray gradient filter, the image as a whole could not be exposed sensibly. If the dark parts of the image were properly exposed, the sky would be too bright and torn out without any structure.
Conversely, the sky would be appropriately exposed, but the dark parts of the image would only be completely black and also without structure. Graduated gray filters are very important, especially in landscape photography, and make it possible to master the usually very high dynamic range in the motif.

6. When do I use which filter, especially with gradient filters?
Most of the time this is pretty self-explanatoryGraduated Filter one selects according to the subject situation found, at the sea at sunset with a straight horizon, for example, one likes to take theReverse gradient filter (or alternatively a hard gradient filter) to slightly adjust the very bright horizon (with the setting sun).
Otherwise mostlyFilter with a soft gradient used, depending on the image effect you want to achieve. Personally, I like a fairly light foreground and therefore use theMedium gradient filter, which darken a little more towards the middle. And sometimes you simply try out different strengths and types of gradients if you have enough time to consciously get different exposure variants.
the Strength of the gradient filters is adjusted to the dynamic range of the subject. In the case of large differences between light and dark parts of the image, a stronger gradient filter is selected, and in the case of smaller differences in brightness, a correspondingly weaker graduated filter is selected.

7. How do I clean filters?
Normally simply with a good microfiber cloth, with larger soiling also with special filter cleaners. I myself only use filters with a very good coating that can be cleaned very easily on site at the spot, regardless of whether
- salt water,
- dirt or
- fingerprints
are to be removed.
8. What is a good filter holder?
The integrated polarizing filter must be easily adjustable, especially when the other filters are already plugged in. At least you should
- a ND,
- a GND and
- a polarizing filter
can combine. the square filter should be well fixed, but still easy to move (gradient filter) and easy handling even at cooler temperatures (with gloves) should not be a problem.
A filter holder should also be absolutely light-tight, which is unfortunately not the case for everyone.

9. How do I calculate exposure times?
This is quite easy, for example via the app (Rolleimoments), but I recommend using the histogram for exposure times of up to 30 seconds.
10. How do I focus when the filter is already in the holder?
With more modern cameras, this can still be done for quite a long time using autofocus, even with relatively little light falling on the sensor. If there is not enough light, then you can use an LED headlight, for example, as an aid. This illuminates the desired autofocus point and the camera can then still focus in most cases.
Alternatively, you can remove the filter attachment, which is very easy with good filter holders, and focus, set the lens or camera to manual focus and reattach the filter attachment. Of course, the focus must then no longer be changed.n.
Ultimately, you can also focus completely manually. In the case of mirrorless cameras, the integrated edge enhancement provides support, or you can use the distance scale on the lens if you cannot see the sharpness correctly in the viewfinder or on the display.
11. Where do I set the focus point?
Clearly. For landscapes, I want maximum depth of field, so I focus very close to the foreground. Because I usually use very wide-angle lenses that have a large depth of field, the image is consistently sharp.
If, as many people do, you focus on the center of the picture or the main subject, the foreground is blurred and you lose the depth effect that is very important in landscape pictures.t.
If I have motifs in the picture that extend from very close to very deep into the picture, such as a very long jetty on a lake, it may be necessary for me to take several shots with different focus points. You would then have to put these together in image processing with suitable software so that you get consistent sharpness.
As a rule, however, I try to avoid this if possible and get by with one recording.

12. Which mistakes can one make and how can they be avoided?
- Improperly cleaned filters (stains),
- blurred image (insufficient tripod),
- wrong exposure (wrongly calculated, histogram ignored),
- incorrectly positioned polarizing filter (dark spots in the picture, polarizing filters should always be aligned with the sky. If you turn too much, the blue in the sky quickly becomes blotchy) or
- Wrong filters (cheap filters made of simple plastic bought from Internet portals, which often show extreme color shifts, often towards magenta or green, or strong vignetting).).
However, 80 to 90 percent of the time, the biggest mistake is that photographers use an unsuitable tripod.
There should already be one really stable model be, preferably a very good onecarbon tripod, which is also sufficiently light to be able to take it with you on longer tours. Also thetripod head should be strong enough to hold the mounted camera securely in place.
Tip: You can easily pay at least 400 euros for a really suitable carbon tripod spend, however, this is a very worthwhile and necessary investment, especially if you are successful long exposures and want to do landscape photography.
